Category: Intermediate

Take your skills to the next level! Improve consistency, master smarter strategies, and refine your shots to gain a competitive edge on the court.

  • How to hold a Pickleball Paddle

    How to hold a Pickleball Paddle

    If you’re new to pickleball, one of the fastest ways to improve long before you start working on spins, roll volleys, or fancy shots is learning how to hold your pickleball paddle correctly. It sounds basic, almost too simple to matter, but your grip is the foundation for everything you do on a pickleball court.

    A proper grip boosts your control, speeds up your reactions, improves your power, and helps you transition between offense and defense just like the pros. And take it from me, if you have no racket sport background then grip mistakes are the hardest habits to fix once you have already started playing pickleball. I have seen so many players getting no where with their game not because they lack skill but simply because they started with the wrong grip so they had to do a lot of unlearning before they started playing shots correctly

    In this article I will show you all the possible ways to hold a pickleball paddle the right way, how to switch grips in between shots and by the end of it you will learn which is the best one for you. Since I am a right handed player, I will share details from a right handed perspective, but if you’re left-handed simply reverse the directions and follow the same steps.

    What a Proper Pickleball Grip Really Means

    Anyone can wrap their hand around a paddle handle, but holding it correctly is something else entirely. A proper grip gives you a cleaner feel on dinks, more stability in fast hands rallies, sharper blocks, and smoother resets. It’s not about squeezing tighter it’s about positioning.

    You’ll find all kinds of grip tutorials online, but the one that forms the base of almost every advanced player’s game is the continental grip. Mastering it will simplify everything you’ll learn afterward.

    The Continental Grip (AKA the “Handshake Grip”)

    If you naturally hold your paddle like you’re shaking hands with it, you’re already doing a version of this grip. But setting it up intentionally makes a world of difference.

    To do it correctly:

    • Reach your hand toward the paddle like you’re greeting someone.
    • Wrap your fingers around the handle in a relaxed, natural position.
    • Look at the “V” formed by your thumb and index finger it should point straight up the paddle toward your face.

    That’s the continental grip. Simple, clean, and incredibly versatile. You can hit dinks, volleys, blocks, resets, drives, and even overheads without switching to a different grip.

    Variations: Neutral, Strong, and Weak Continental Grips

    The continental grip isn’t fixed in one exact position. Instead, it has subtle variations that act like fine-tuning adjustments. These tiny angles completely change how your paddle behaves, and advanced players use them constantly.

    Neutral Continental Grip

    This is your all-purpose, everyday grip. It keeps the paddle face stable and predictable.

    Use it for:

    • Dinks
    • Resets
    • Blocks
    • Clean forehand and backhand drives
    • Controlled volleys

    The “V” points straight up the paddle. You’ll use this around 80% of the time.

    Strong Continental Grip

    Rotate your hand slightly clockwise (lefties go counter-clockwise) so the “V” angles toward the paddle edge. Now your wrist, forearm, and paddle align with more leverage, giving you extra stability and power.

    Best used for:

    • Overheads
    • High put-aways
    • Offensive counterattacks
    • Driving forehands
    • Punch volleys at the chest

    If someone ever told you, “You hit so effortlessly!” its because you have a strong continental grip.

    Weak Continental Grip

    Rotate your hand in the opposite direction so the “V” points toward the other paddle edge. Most players never use this intentionally because it reduces power.

    But it does have uses:

    • Slices
    • Cuts
    • Defensive scrapes
    • High, soft roll-backs

    For most players, neutral and strong grips cover almost everything.

    Where to Hold the Paddle on the Court

    Knowing how to hold the paddle is one thing; knowing where to position it is just as important, here I am not referring to your wrist placement on the paddle handle, infact I am showing you the right posture to have, this will help you hit cleaner shots and not get caught in that awkward ‘chicken wing’ position.

    Neutral Ready Position

    This is your “home base,” and high-level players return to this posture constantly.

    Here’s what it looks like:

    • Paddle held in front of your chest
    • Elbow relaxed
    • Paddle tilted slightly forward
    • Wrist neutral not bent up or down
    • Optional: support the paddle lightly with your off-hand for stability

    This position gives you the quickest reaction window possible.

    At the Kitchen Line

    Your posture and mindset shift here because exchanges are fast and unforgiving.

    At the NVZ line:

    • Hold your paddle slightly higher (chest height or above)
    • Keep your knees bent
    • Weight leaning forward
    • Grip slightly stronger so the paddle doesn’t twist

    Never stand upright or let the paddle drop.

    Defending Power Shots or Blocking Drives

    Blocking drives is all about simplicity.

    • Keep the paddle in front
    • Hold the face slightly open
    • Absorb the ball rather than pushing at it
    • Use a neutral grip for stability

    Too strong a grip sends the ball sailing. Too weak and the paddle wobbles.

    Do You Need to Switch Grips Mid-Rally?

    Yes but don’t worry, you won’t even notice it after some practice. Just like tennis or badminton, your hand naturally adjusts mid-rally as certain shots require different leverage. Beginners often feel awkward switching grips, but it quickly becomes muscle memory. Eventually, you won’t think about grip changes at all they’ll happen automatically.

    Got a Grip on It?

    Learning how to hold your pickleball paddle properly is one of the easiest high-impact improvements you can make. If any of these grips feel strange at first, that’s normal. Stick with it. Your swing will get smoother, your blocks cleaner, and your fast hands more confident. Once the continental grip and its small variations become second nature, the rest of your game becomes far easier.

    FAQs

    What is the best grip for beginners?


    The continental (handshake) grip is the best starting point because it works for most shots and helps both forehand and backhand transitions.

    Should the paddle be held tightly or loosely?


    Firm but relaxed just like holding a hammer. Too tight = no control. Too loose = paddle twists.

    Do I need different grips for different shots?


    Eventually, yes. Neutral for most shots, strong for power.

    What grip is best for dinking?


    Neutral continental. It keeps your paddle face stable and low.

    How high should the paddle be at the net?


    Around chest height, slightly forward.

    Is switching grips mid-rally okay?


    Absolutely. With practice, it becomes second nature.

    Also Read: What are the basic pickleball rules?

  • Detailed guide on Pickleball drills: Beginner to Advanced level

    If you’re struggling to find the right pickleball drills that actually make a noticeable difference in your game, you’re not alone. Many players hit a plateau simply because they rely on casual play instead of focused training. The truth is simple: the right drills can sharpen your technique dramatically, faster than regular games ever will. With a little structure and the right practice routine, your weaknesses can quickly turn into your strengths and that’s exactly what this guide is going to help you achieve.

    Below, you’ll find the most effective pickleball drills for beginners, intermediate players, advanced players, solo practice, partner practice, at-home sessions, machine training, and more. Each drill is explained with depth and clarity so you can implement it immediately. Whether you’re working on footwork, dinks, resets, third shots, volleys, or accuracy, consider this your complete roadmap to improving your pickleball game.

    1. Paddle-Up Control Drill

    This simple beginner drill teaches touch, paddle awareness, and wrist control, three foundational skills that later influence your dinks, drops, and resets. Start by tapping the ball upward off your paddle repeatedly, keeping the ball centered on the paddle face. Once you’re comfortable, try walking around, increasing and decreasing the bounce height, or moving laterally. It’s also a great way to warm up before a match.

    2. Selfie Bounce Drill

    Begin with your paddle flat, bounce the ball upward, allow it to hit the ground once, and scoop it back into a controlled bounce. This drill reinforces paddle angle control and teaches beginners to transition between soft touch and controlled rebound. Pair it with early footwork practice for maximum benefits.

    Best Pickleball Drills for Intermediate Players

    By the time most players reach the intermediate stage, two weaknesses commonly appear: predictable dinking and inconsistent third-shot drops. These drills target both issues.

    1. Triangle Dinking Drill

    Intermediate players often fall into patterns, we notice a lot of dinking to the same spot repeatedly, which makes them predictable and easy to pressure. Triangle dinking forces you to vary direction intentionally.

    Place three target markers on the opponent’s side (left, middle, right). Aim for each in sequence. This helps refine forehand/backhand touch, court vision, and your ability to change direction under pressure — all vital skills for high-level kitchen play.

    2. Third Shot Drop Repetition Drill

    Stand at the baseline while your partner occupies the kitchen line. Your focus: drop the ball softly into the kitchen with arc, touch, and consistency. This drill builds the muscle memory needed to transition from the baseline to the non-volley zone with confidence a move that separates intermediate players from advanced ones.

    Best Pickleball Drills for Advanced Players

    Advanced drills require stamina, quick transitions, and total control over shot placement. These exercises replicate high-level match scenarios.

    1. Hit-and-Run Court Movement Drill

    Begin at the baseline. Your partner hits a deep, fast drive down the sideline; you chase it down and return cross-court. They hit another ball down the opposite sideline, forcing you to sprint again. This continuous movement builds elite-level footwork, lateral speed, and drive accuracy.

    2. Dink-and-Lob Combination Drill

    This advanced deception drill teaches you how to disguise your lob behind a soft dink. Your opponent dinks from the kitchen; you return a soft dink, then suddenly switch to a high-arching lob aimed three feet from the baseline. This keeps opponents honest and prevents them from over-crowding the kitchen line.

    Pickleball Drills for Two Players

    Training with a partner multiplies your improvement especially when both players commit to consistency.

    1. Continuous Volley Battle

    Both players volley back and forth without letting the ball bounce. Add alternating right/left volleys to simulate real-time exchanges. This drill sharpens reflexes, paddle angle control, and comfort at the kitchen line — essential for doubles play.

    2. Bert & Erne Footwork Drill

    Since the Erne involves jumping outside the court to attack a ball at the net, and the Bert involves crossing into your partner’s zone to poach an Erne, both require precise timing and footwork. Practice the approach steps hop, plant, explode and integrate soft setups to prepare these shots safely.

    Pickleball Solo Drills

    Solo training is invaluable when a partner isn’t available. These drills help you refine technique without relying on someone else.

    1. Shadow Swing Technique Drill

    Perform forehand and backhand swings in the air exactly as you would during a real point. Study your paddle angle, shoulder rotation, and follow-through. Using a mirror amplifies results. This drill strengthens your muscle-memory foundation — the secret behind smooth, repeatable strokes.

    2. Serving Accuracy Targets

    Set up multiple targets on the opposite baseline and practice hitting each repeatedly. Consistency in serve depth and placement dramatically improves your ability to set the tone of a rally. You’ll quickly notice your error count decreasing and free points increasing.

    Pickleball Wall Drills

    A simple wall can unlock hours of meaningful practice especially for players living in urban areas.

    1. Wall Target Accuracy Drill

    Mark a spot on the wall and aim to hit it repeatedly from various distances. This builds precision and prepares you to hit specific zones under pressure. Once you’re consistent, move the target higher or wider to keep challenging yourself.

    2. Drive-and-Move Reaction Drill

    Hit hard drives from several yards back, allowing the ball to rebound off the wall. Move quickly to intercept the rebound and drive again. This simulates high-speed exchanges and helps build stamina and predictable ball-tracking skills.

    Pickleball Drills You Can Do at Home

    You don’t need a court for every training session. These drills keep your skills sharp even on busy days.

    1. Footwork Shuffle Lines

    Mark two parallel lines on the ground and shuffle side-to-side between them while maintaining a low stance. This improves agility, balance, and early movement all critical for reaching dinks and sharp angles.

    2. Sprint Intervals

    Set two markers and alternate sprints with recovery walks. Pickleball isn’t just about touch it requires explosive bursts, and this drill mimics in-game movements.

    Fun Pickleball Drills to Keep Training Interesting

    Training doesn’t always need to be intense. These lighter drills keep practices enjoyable while sharpening reflexes and ball control.

    1. Reflex Pressure Drill

    Start with soft dinks, then unpredictably fire a fast drive at your partner. They must calmly absorb the shot and return it softly without popping it up. This teaches poise under pressure and prepares players for competitive play.

    2. Catch-and-Return Control Drill

    Your partner hits balls at varying speeds and spins. You must “catch” the ball on your paddle, reducing its bounce to nearly zero before sending it back. This develops elite-level control and touch essential for resets and net play.

    What Skills Do These Drills Build?

    These drills collectively enhance the four pillars of strong pickleball performance:

    • Balance – for stability and shot execution
    • Footwork & stance – for positioning and court coverage
    • Reflexes & hand-eye coordination – for volleys and fast exchanges
    • Ball control – for dinks, resets, and drops

    How to Plan an Effective Drilling Session

    A successful session requires structure so before you even decide to book a session you need to ask yourself these questions:

    • What specific weakness do I want to improve today?
      This will help you in transforming your weakness into your strength, for eg: you were getting caught on a lob constantly, in that case you will need to focus on doing a drill to counter the lob.
    • Am I practicing alone or with a partner?
      This will help you determine the types of drills that you can do, just like in the gym, coming in with a pre-determined plan of action will help you to be productive in a drilling session.
    • Do I have court access or only home space?
      Againg depending on your answer you can set a plan of action either solo drills or even wall drills can be done.
    • How much time do I have?
      Knowing this can help you in determining how many areas can you work on in a session.

    Mix up drills regularly so training stays exciting and productive.

  • Complete list of faults in Pickleball

    A fault in pickleball is any rule violation that stops play and it is important to learn about them in order to reduce avoidable errors, know if your opponent is manipulating a point especially during close games. This guide breaks down every type of pickleball fault in a clear, practical way, focused on non-officiated recreational play.

    Pickleball being the most rapidly growing sport still falls victim to lack of techlonogy for their scoring system, there have been some horrendous calls which completely chance the momentum of the game, so learning about pickleball faults is absolutely necessary before heading into a tournament and ofcourse it does help during your recreational sessions as well.

    Also Read: List of all official Pickleball rules as per USA Pickleball which is the most followed worldwide

    Why Pickleball Faults Matter

    Faults don’t just end a rally—they can change momentum and swing points dramatically. So learning about them will help you keep your cool on court, knowing when you have lost a point is as important as practicing drills in pickleball.

    • If the receiving team commits a fault, the serving team earns a point.
    • If the serving team commits a fault, they lose the serve (or the second server gets the ball, or it becomes a side-out).
    • In rally point games if a fault is commited by either team a point is rewarded to the other regardless of which team served in that point

    Understanding faults is one of the fastest ways to clean up your game especially if you’re new or leveling up from beginner to intermediate.

    Types of Pickleball Faults

    Below is a comprehensive, easy-to-understand list of every fault you should be aware of before stepping on a pickleball court.

    Serving Faults

    These faults happen before or during the serve:

    • Serve doesn’t land in the correct crosscourt service box

    A serve must clear the net and land diagonally across, inside the boundaries.

    • Serve contacts the Non-Volley Zone (Kitchen) line

    It may hit the baseline or sidelines—but never the kitchen line.

    • Either team violates the double-bounce rule

    The receiving team must let the serve bounce once, and the serving team must let the return bounce once.

    • Server foot faults

    A serving fault occurs if:

    • The server doesn’t have at least one foot on the ground behind the baseline
    • A foot touches the baseline
    • A foot touches inside the court or beyond the imaginary sideline/centerline extensions

    • Incorrect server or wrong position

    If players are not standing in the correct right/left position based on score, it is a fault.

    Also Read: Types of serves in Pickeball

    In-Play Faults

    These faults happen during rallies:

    • Ball hits the net and doesn’t cross

    Serve or return any stroke that fails to clear the net.

    • Ball lands out of bounds

    A clear line fault.

    • Ball bounces twice before being hit

    If you don’t reach it in time, rally over.

    • Player catches, carries, or throws the ball

    Any unintentional carry or scoop is a fault.

    • Double-hits not in a single continuous motion

    A clean “one motion” double contact is legal, but two distinct hits are not.

    • Player creates a distraction

    Yelling, sudden movement, paddle waving, if meant to distract, it’s a fault. Again this type of fault is quite subjective but the next time you feel an opponent is doing this intentionally you can always ask them to refrain from doing so

    • Player intentionally aims for an opponents face

    Yes all those BenJohns highlights having a full send on the ball did look cool, but you can no longer do it as it will result in a fault.

    Net Faults

    Net violations are straightforward:

    • Player or clothing/paddle touches the net

    If the ball is still in play, this is a fault every time.

    • Hitting the ball before it crosses the plane of the net

    You may follow through across the plane, however the ball must cross first.

    • Hitting the ball around the post improperly

    Going around the post is legal only if you hit the ball after it crosses the plane.

    Kitchen (Non-Volley Zone) Faults

    These are the most misunderstood in pickleball:

    • Volleys while standing in the kitchen

    Anything touching the NVZ zone be it your foot, paddle, or clothing counts.

    • Momentum into the kitchen after a volley

    You may hit a volley outside the kitchen, but if your momentum carries you in, it’s still a fault.

    • Touching anything in the kitchen after a volley

    Clothing, paddle, even touching your partner counts as entering the NVZ.

    • Volleys after stepping out of the kitchen without both feet re-establishing

    You must reset both feet behind the line before volleying again.
    Also Read: How stacking works in Pickleball

    Gear & Contact Faults

    • Ball hits the player or their clothes

    If the ball touches anything except your paddle or the hand holding the paddle (below the wrist), you lose the rally.

    • Paddle touches the net

    Same as above, its a fault.

    • Extra balls fall out of your pocket

    If additional balls drop during play, it’s a fault.

    • Not holding the paddle when it strikes the ball

    Losing grip mid-swing? Fault.

    • Using earbuds or headphones

    Only hearing aids are allowed.

    Player Position Faults

    • Serving from the wrong side

    Based on score:

    • Even score: serve from right
    • Odd score: serve from left

    • Incorrect receiver position

    Receiver must be in the correct diagonal position.

    • Switching sides incorrectly in doubles

    Switch only when your team wins a point.

    Faults for Stopping a Rally

    Stopping a rally early is a fault unless 100% valid.

    Faults include:

    • Stopping play to claim a broken ball (before the rally ends)
    • Stopping for an equipment issue (paddle drops, hat falls, etc.)
    • Incorrectly identifying a supposed position error
    • Stopping because of an item on the court unless it directly interferes

    Once the rally ends, players can inspect the ball and decide if a replay is fair.

    Learning Pickleball Faults Faster

    There’s no need to memorize the entire rulebook as most faults boil down to:

    • Footwork
    • Positioning
    • Basic kitchen awareness
    • Clean strokes

    Once those become second nature, you’ll focus less on rules and more on strategy.

    Final Thoughts

    Pickleball faults may look overwhelming on paper, but once you’re on the court, the majority become instinctive. The key is understanding the big one which are kitchen violations, foot faults, and positioning issues as they decide most rallies. As you play more, you’ll start recognizing patterns, avoiding unnecessary errors, and sharpening the parts of your game that matter most.

    FAQs

    What exactly is a fault in pickleball?

    A fault in pickleball is any rule violation that stops play. When a fault occurs, the rally ends immediately. If the serving team commits the fault, they lose the serve; if the receiving team commits it, the serving team earns a point.

    What are the most common serving faults?

    Common serving faults include stepping on or over the baseline during the serve, serving from the wrong position, hitting the serve into the net, sending the ball out of bounds, or failing to contact the ball below waist level. A serve must also clear the non-volley zone (kitchen) and land in the correct diagonal service box.

    Is it a fault if the ball hits the net and lands in the right service box?

    Yes. Unlike tennis, there are no “lets” in pickleball serving. If the serve clips the net even slightly and still lands in the correct service box, it is still a fault, and the server loses that rally.

    Is stepping into the kitchen after a volley always a fault?

    Yes. Any part of your body, paddle, clothing, or accessory touching the non-volley zone (or its line) after hitting a volley is a fault. This includes momentum carrying you forward into the kitchen even if the volley happened perfectly clean.

    What happens if the ball hits a player?

    If you get hit by the ball on your side of the net before it bounces, it is a fault against you even if the ball was going out. If it hits you after it bounces, the rally continues as normal.

    Can a player call a fault on their opponent?

    Yes. In recreational play, players call faults on themselves and on their opponents based on what they see. In tournament play, referees typically make the final call, though players are still expected to play honorably.

    Is hitting the ball out of bounds always a fault?

    Yes. If your shot lands clearly outside the court lines, it is a fault, and the opponent wins the rally. However, if a shot touches the line even slightly it is considered an in ball.

    Is double-hitting the ball a fault?

    It depends. If the ball unintentionally hits your paddle twice during one continuous motion, it is legal. But if it is a controlled double-hit or a stop-and-rehit, that is a fault.

    Is it a fault if the ball hits the net post?

    If the ball hits the net post before crossing over into the opponent’s court, it is a fault. If it passes cleanly over the net and then hits the post (on the outside), the ball is out.

    What happens if players are in the wrong positions during the serve?

    If the wrong player serves or receives the ball, it is considered a positional fault. Once the rally ends, the incorrect positioning is corrected and the score is adjusted according to the rules. In sanctioned tournaments, this often results in the rally being replayed unless a point was incorrectly awarded.

    If you are new to pickleball and have learned about all the faults but not yet confident to step on the court then do read our guide on how to play pickleball, this will definitely give you the push you need to enjoy the sport we all love.

  • Detailed guide on Pickleball scoring rules

    Pickleball is one of the fastest-growing sports in the world, yet the scoring system is what often confuses new players the most. The good news? Pickleball scoring especially traditional side-out scoring is far simpler than it seems. Once you walk through a game or two, you’ll be calling out scores confidently and probably even helping someone else understand the ropes.

    Whether you’re stepping onto the court for the first time or trying to clean up the gaps in your understanding, this guide breaks down exactly how pickleball scoring works for doubles and singles, why it’s different from tennis and badminton, and what you need to know about the rising popularity of rally scoring.

    Why Pickleball Scoring Confuses Beginners

    Pickleball borrows pieces of scoring logic from sports like volleyball, tennis, and table tennis but ultimately, it has its own set of rules. The mix of switching sides, calling a third number in doubles, and only scoring on the serve can feel unusual at first. But once you know the pattern, it becomes second nature.

    Traditional Side-Out Scoring

    Traditional scoring also known as side-out scoring is the standard format you’ll encounter in recreational games and most amateur tournaments. It works for both singles and doubles. The idea behind it is quite simple:

    Only the serving team can score a point.

    If the serving team wins the rally → they score.
    If the serving team loses the rally → the serve switches (a “side-out”).

    Think of it like baseball: only the team “at bat” can score. In pickleball, the serving team is “at bat.”

    Also Read: Types of serves in Pickleball, which are legal and which are not

    Starting the Game

    Traditionally, the team standing on the court’s northwest side serves first, but many players determine this with a coin toss, paddle spin, or a quick agreement.

    • Games are typically played to 11 points, win by 2.
    • The first serve of the entire game starts on server #2—so the score begins at 0-0-2.
    • The first serve is always hit diagonally from the right (even) side.

    How Scoring Works During Play

    1. The serving team wins the rally → they earn a point.

    Players on the serving team switch sides after earning each point.
    The same player continues serving until the team commits a fault.

    2. The serving team loses the rally → fault → next server gets the ball.

    Once both players on the serving team have served and lost their rally, it becomes a side-out, and the opposing team gets to serve.

    3. The receiving team NEVER switches sides.

    Only the serving team rotates. The players returning the serve stay put the entire time.

    Understanding the Three-Number Score in Doubles

    In doubles pickleball, the score is called:

    Serving team’s score – Receiving team’s score – Server number

    Example:
    6-3-2 means…

    • Serving team has 6
    • Receiving team has 3
    • The second server is serving

    If you hear “side-out,” it means both servers on the previous team have used their turn, and the serve now goes to the other pair.

    Player Positioning in Doubles

    Proper positioning is essential—and it’s also where many new players make mistakes.

    Rule 1:

    If your team’s score is even, the player who started on the right side must be serving from the right.

    Rule 2:

    If your team’s score is odd, that same starting server will now be on the left side.

    Everyone else may stand anywhere on the court or even outside the court as long as the correct server and correct receiver are in the correct boxes.

    If you are new to pickleball and have to passion to be a better player then do check our detailed guide on how to play pickleball for tips that will help you in your conquest.

    Singles Pickleball Scoring

    Singles scoring follows the same side-out rules, but without the third number.

    In singles:

    • You only call: server’s score – receiver’s score
    • You switch sides every time you score a point
    • Only one serve per side (no partner = no second server)

    Like doubles, games are typically played to 11, win by 2.

    What Is Rally Scoring in Pickleball?

    Rally scoring is a newer scoring format gaining popularity in leagues, rec play, and Major League Pickleball.

    In rally scoring:

    A point is awarded on every rally, no matter who served.

    This is the biggest difference from traditional pickleball scoring.

    Rally scoring basics:

    • Games often go to 15 points
    • Both teams score, regardless of who served
    • Players switch sides based on the score (odd/even) similar to volleyball
    • It keeps games shorter and more predictable in length
    • Built for fast-paced, spectator-friendly formats
    • Ideal for tournaments that aim to complete multiple categories in the same day

    Tips for Learning Pickleball Scoring Faster

    • Play games instead of studying diagrams
    • Say the score out loud before every serve
    • Focus on where you started the game i.e. your “even” side
    • Remember: only the serving team rotates
    • Treat the third number in doubles like a “turn indicator”

    Within one or two games, you will already begin to get a feel for the pattern.

    When Does a Team Win?

    If the match is a service point match then a team wins when:

    • They reach 11 points
    • AND they lead by at least 2 points

    If the score reaches 10-10, you must win 12-10 or higher.

    That’s why pickleball is often dramatic—momentum can swing fast.

    If a match is a rally point match then the first team to reach 15 points wins, also unless clarified most rally point games end with a golden point incase of a 14-14 score.

    Final Thoughts

    Pickleball scoring might feel intimidating the first time you hear “0-0-2,” but once you experience a few rotations on the court, it becomes one of the simplest scoring systems in racket sports. Traditional side-out scoring rewards consistency and strategy, while rally scoring is gaining traction as a faster, more dynamic format.

    Whether you’re playing casual doubles with friends or preparing for your first tournament, understanding the flow of scoring will instantly make the game feel more natural and more fun.

  • What is Stacking?

    If you’ve played doubles pickleball, you may have heard players talk about “stacking.” And if you’ve never tried it yourself, it might sound confusing at first. But once you understand how it works, stacking can completely change the way your team controls rallies, positions itself, and builds smarter strategies.

    This guide breaks down everything you need to know about stacking in doubles pickleball, how it works on both serve and return, and when it helps (or hurts!) your team, yes there are times when not stacking can also win you points.

    What Is Stacking in Pickleball?

    Stacking is an advanced doubles strategy where teammates start points on the same side of the court instead of splitting left and right like in traditional positioning. By doing this, players can stay on their preferred side for the entire match usually to protect a weakness or maximize a strength. If you’ve watched pro pickleball matches then you will see that all teams consist of a right side player and a left side player this is because stacking is the most effective tactic in Pickleball.

    You still have to follow the basic serving and receiving rules, meaning the correct player must serve or receive from the correct box. But outside of those two requirements, players can stand almost anywhere on (or even slightly off) the court.

    This makes stacking a powerful tool when you want:

    • Both forehands in the middle
    • A specific player covering a specific side
    • To attack your opponents’ weaker player or weaker wing
    • To create unpredictable movement and disrupt patterns

    Understanding Even and Odd Sides

    Each player has an “even” (right) and “odd” (left) side. Your even side is determined by where you start the match and not necessarily the standard right-hand position.

    • When your team’s score is even, the original first server stands on the even/right side.
    • When your team’s score is odd, that player stands on the odd/left side.

    Stacking simply rearranges where the non-server or non-receiver stands before the point starts.

    How Stacking Works

    The mechanics of stacking depend on whether you’re serving or receiving. Here’s how both look in practice:

    Stacking on the Serve

    When stacking during service:

    1. The correct server stands in the proper service court (even or odd).
    2. Their partner stands next to them on the same side usually just outside the sideline so the server has enough space to serve and move.
    3. Once the serve is hit, both players slide into their preferred positions.

    Example:
    If your team wants both forehands in the middle, you may start on the right side every time and slide into position once the ball is served.

    This setup keeps everything legal while allowing you to quickly “switch” into your chosen formation without confusion.

    Stacking When Returning a Serve

    This is where stacking becomes trickier.

    Instead of standing in front of the non-volley zone, the non-receiving partner waits just outside the sideline on the same side as the receiver.

    Here’s the flow:

    1. The receiving player stands in the correct service return box.
    2. The partner stands beyond the sideline near the kitchen line.
    3. As soon as the receiver hits the return, both players slide into their desired positions.

    Because the returner starts deeper and farther from their final spot, stacking on the return requires:

    • A deep return
    • Time to move
    • Good communication

    It’s doable and once you start practicing it, it will become second nature.

    Stacking vs Switching

    These two terms often get blended together, but they’re not the same.

    Switching

    Switching happens after the serve or return, usually during the first or second shot when teammates trade sides mid-rally.

    Stacking

    Stacking happens before the point begins, positioning players so they can seamlessly switch immediately after contact.

    Most advanced teams use both: stack → serve/return → switch.

    Hand Signals for Stacking

    To avoid shouting instructions (which your opponents will hear!), many teams use quick hand signals behind the back of the player at the kitchen:

    • 🖐️ Open hand – Switch
    • Closed fist – Stay
    • ✌️ Two fingers – Fake switch (used to confuse opponents)

    Hand signals become crucial once rallies get fast and court movement increases.

    Is Stacking Legal in Pickleball?

    Yes, stacking is 100% legal.

    According to USA Pickleball Rule 4.B.7:

    “In doubles… there is no restriction on player positioning as long as all players are on their side of the net.”

    Only two things must remain correct:

    • The proper player must serve.
    • The proper player must return the serve.

    Everything else is fair game.

    Does Handedness Matter?

    Absolutely.

    A lefty–righty pair is one of the most common reasons teams adopt stacking. By stacking correctly, you can keep both forehands pointed toward the middle this will let you and your partner get maximum reach, power, and control.

    Half Stacking vs Full Stacking

    Full stacking

    Stacking on both serve and return.

    Half stacking

    Stacking only when serving, and playing traditional positions when receiving.

    Many newer players prefer half stacking because stacking on the return requires more coordination and footwork.

    When Should You Stack?

    Stacking helps most when:

    • You want both forehands in the middle
    • A player has a strong forehand or weak backhand
    • You want to maximize a dominant right-side or left-side player
    • You want to break opponents’ rhythm
    • You want to take advantage of a slow or predictable opponent

    If a certain formation helps you win more points then stack into it.

    When NOT to Stack

    Stacking isn’t always the best choice.

    Avoid stacking when:

    • It puts a teammate’s weaker shot in the middle
    • Both players end up covering mostly backhands
    • It causes confusion or miscommunication
    • Your returns aren’t giving you enough time to switch
    • You’re making positioning errors because you’re overthinking

    Stacking should help simplify your strategy and not complicate it.

    Pro Tips to Stack Successfully

    Return deep with height
    Avoid rushing while hitting
    Communicate with signals
    Practice drills that include switching footwork
    Start with half stacking before moving to full stacking

    Bottom Line

    Stacking is an advanced but incredibly useful strategy in doubles pickleball. Once you understand how to position yourself and when to shift, it becomes a powerful weapon to highlight your strengths, hide weaknesses, and create constant pressure on your opponents.

    Try it in your next match you’ll be surprised how much more control you gain over the court.

    FAQs

    Is stacking allowed in every level of pickleball?

    Yes. Stacking is completely legal and used at all levels, from recreational play to pro tournaments.

    Do both players have to stack, or can one stay in their usual spot?

    Teams can stack fully, half stack, or not stack at all. It’s entirely based on strategy and comfort.

    Is stacking difficult for beginners to learn?

    It can feel confusing at first, but once you understand even/odd positions and practice moving together, it becomes second nature.

    Do teams need hand signals to stack properly?

    Hand signals aren’t mandatory but are highly recommended to avoid miscommunication especially during fast games.

    Should I stack if my partner is left-handed?

    Yes! Lefty–righty teams benefit the most from stacking because both forehands can stay in the middle.

    Is stacking only useful for advanced players?

    Not at all. Even casual players can benefit, especially when trying to protect a weakness or simplify positioning.

    Is stacking risky?

    Only if communication is poor. With good signals and practice, stacking becomes one of the safest and smartest strategies in doubles.

  • How to improve your serve in 5 simple steps

    A pickleball rally starts with a serve, and when it is your chance to serve, you can dictate the flow of the point from your first shot itself. In this article, we will show you 5 tricks that every pro player uses to make their serve into a weapon, so without further adieu, lets get into it!

    5 Pickleball Serve Tips That’ll Instantly Make You Look Like You Know What You’re Doing

    If there’s one thing that sets the tone for every rally, it’s your serve. You could have the best dink game in town, but if your serve is weak, you’re basically starting every point on defense. So let’s fix that.

    I’ve seen it all on the courts the stiff-arm servers, the “I forgot my hips exist” folks, and the dramatic tossers who think they’re auditioning for Wimbledon. Let’s clean up those habits and serve like a pro.

    Tip #1 – Use Your Whole Body, Not Just Your Arm

    If your serve looks like you’re swatting a fly, we need to talk.

    A lot of beginners (and even a few sneaky intermediates) try to serve using just their arm or wrist. Sure, it works, but it’s like trying to hit a home run using only your forearm you’re leaving all that power on the table.

    Think of your body as a chain your legs, hips, core, and shoulders should all work together. Start from the ground up and rotate through the shot. That’s your “kinetic chain.” Use it, and suddenly your serve feels smoother, stronger, and way more consistent.

    Tip #2 – Master a Closed or Semi-Open Stance Before Going Fully Open

    Here’s where I see a lot of players go wrong they face the net square-on, like they’re posing for a passport photo.

    When you’re serving, try a closed stance, where your front shoulder points toward the net. If that feels too tight, a semi-open stance works just fine. This gives you room to rotate your body and really drive through the ball.

    It’s not that an open stance is “wrong,” but it’s like running before you can walk. Master the fundamentals first, your future self (and your shoulder) will thank you for it.

    Pro Tip: If you’ve been hammering in nothing but power serves, your opponent is already coiled and waiting to crush the return. They’ve read your play! To flip the script and win the mental battle, introduce the surprising slow serve. By wrong-footing them with a soft shot they weren’t expecting, you disrupt their momentum and instantly reclaim control of the point. Think of the serve as your opening gambit in a chess match; always mix up pace and placement to keep your opponent guessing and off-balance. Read our guide on the types of pickleball serves to learn what is a power serve, slow serve and other

    Tip #3 – Tension Is the Enemy of Power

    Here’s a coaching truth: if your grip looks like you’re trying to strangle the paddle, your serve is doomed.

    A tight grip and tense arm make your motion jerky and inconsistent. Instead, loosen up. Let the paddle do some of the work.

    Your motion should be smooth a simple low-to-high swing, like you’re brushing up through the ball. Imagine hitting through three balls lined up in a row, not just one. That’s the follow-through we want.

    Pickleball serves are all about rhythm, not muscle. So relax that death grip, take it from us, your shots (and your elbow) will love you for it.

    Tip #4 – Don’t Reach Back, Just Rotate

    Some players think they need a giant backswing to get power. You don’t. This isn’t golf.

    If you’re taking your paddle halfway to your neighbor’s backyard, you’re doing too much. Instead, set up with your paddle near your hip, turn your shoulders, and let your body rotation bring the paddle through naturally.

    Power doesn’t come from reaching, rather, it comes from timing and technique. Plus, you’ll look way smoother doing it.

    Tip #5 – Stop Tossing. Just Drop It.

    Here’s a funny thing that a bunch of players do is that they toss the ball like they’re pitching a softball. Don’t do that.

    In pickleball, the serve drop rule means you’re literally just… dropping it, duh!. Hold the ball around hip height and as you start your swing, simply let it fall. No toss, no flick, no drama.

    Your goal is one clean, fluid motion — drop and hit. It’s simpler, more consistent, and way easier to repeat under pressure.

    https://www.instagram.com/reel/DQ_ksz6jSk6/?igsh=MWNnN2RrZTNyNmJ0dw==

    Final Thoughts

    Serving might look simple, but it’s one of the most technical shots in the game. Each of these small details right from using your legs to relaxing your grip, it all adds up to a serve that’s not just consistent but confident.

    So next time you step onto the court, remember:
    ✅ Engage your whole body.
    ✅ Stay relaxed.
    ✅ Drop, don’t toss.

    And if all else fails just smile, breathe, and remember that even the pros miss their first serve sometimes.


  • Types of Pickleball Serves

    Types of Pickleball Serves

    Serving is one of the most important skills in pickleball. A well-placed serve can set the tone for the rally, put pressure on your opponent, and create opportunities to dominate the point. In this guide, we’ll walk through five essential serves, from power to spin, including how to execute them, who they’re best for, and drills to perfect your technique.


    1. Power Serve

    The power serve is all about speed and force. It’s designed to challenge your opponent’s reaction time and put them on the defensive right from the start.

    Execution Tips:

    • Knee Bend & Body Rotation: Keep your knees slightly bent to engage your core. Rotate your hips as you swing to maximize power.
    • Full Swing: Avoid flicking the ball from your elbow. Transfer your body weight from the paddle side to the opposite side during the swing.
    • Low Trajectory: Aim for a fast, flat serve just inches over the net. You can slightly reduce speed and clear the net higher for more safety while still landing deep in the service box.
    • Soft Grip: Hold your paddle lightly. A tight grip limits the energy transfer from your legs through your core and into the paddle.

    Who Should Use It:
    Best suited for players who already have consistent ball placement. The goal is to combine precision with speed. The fast pace can overwhelm opponents who aren’t ready to react quickly.

    Drills:

    • Practice serving to both the even and odd sides.
    • Mix placement with power: target corners or the middle to keep opponents guessing.
    • Use it against opponents with weaker backhands for maximum effect.

    2. Lob Serve (High Soft Serve)

    The lob serve is slower, with a high, arcing trajectory that lands deep in your opponent’s court. It may seem simple, but it can be deceptively effective.

    Execution Tips:

    • Contact Point: Strike the underside of the ball, not the back.
    • Follow-Through: Swing upward toward the sky, rather than aiming at your opponent.
    • Body Rotation: Even though it’s slower, still rotate your body to generate smooth power.

    Why It Works:
    The slow speed and high bounce often cause opponents to overthink and mis-hit their return. Because it appears easy, they may try to return it too aggressively, increasing the chance of errors.

    Who Should Use It:
    Ideal for beginners who already have a solid deep serve. It’s a great way to mix up your serving style and challenge opponents differently.

    Drills:

    • Focus on consistently landing the ball deep.
    • Vary height slightly to add unpredictability.
    • Combine with power serves for contrast.

    3. Short Angled Serve

    The short angled serve is a precision placement shot that lands just past the non-volley zone near the sideline. It’s excellent for pulling your opponent off the court and creating open space.

    Execution Tips:

    • Aim for just past the kitchen corner.
    • Serve from the same location as your other serves to avoid telegraphing.
    • Observe your opponent’s position, the more unexpected the serve, the more effective it is.

    Why It Works:
    A well-placed short angled serve stretches your opponent laterally, often leaving gaps between them and their partner. A weak return creates opportunities for aggressive follow-up shots.

    Who Should Use It:
    Best for players rated 3.0 and above, as it requires precise placement.

    Drills:

    • Practice adding slight sidespin on the odd court to push the ball further away from your opponent.
    • Drill extensively to ensure the ball clears the NVZ while landing accurately.

    4. Sidespin Serve

    The sidespin serve introduces spin to the ball, making it curve unpredictably after the bounce. This can force weak returns and disrupt your opponent’s rhythm.

    Execution Tips:

    • Swing from outside to inside, “cutting” the back of the ball to impart spin.
    • Use a low-to-high motion, hitting the ball higher and slower rather than hard.
    • Focus on spin rather than power.

    Why It Works:
    The unexpected bounce can throw off timing and positioning, creating weak returns that you can exploit.

    Who Should Use It:
    Recommended for players 3.0 and above who have mastered deep power serves and lob serves. Players who naturally hit with spin may find this easier to incorporate.

    Drills:

    • Repetition is key — practice consistently to develop accuracy.
    • Include your standard pre-serve routine to improve consistency.

    5. Topspin Serve

    The topspin serve involves striking the ball so it spins forward end over end. The ball accelerates off the bounce and can be difficult to time for your opponent.

    Execution Tips:

    • Use an open or semi-open stance.
    • Start with the paddle nearly perpendicular to the ground.
    • Strike the ball with a slightly open face, moving from low to high and finishing toward your opposite shoulder.
    • Keep your wrist relaxed and allow speed to build naturally through the motion.

    Why It Works:
    Topspin makes the ball kick forward unpredictably after hitting the ground, often forcing weak returns and catching opponents out of position.

    Who Should Use It:
    Advanced players who can control spin at varying speeds. Mastery of this serve requires practice but can be a powerful weapon.

    Drills:

    • Begin closer to the net to perfect the motion, then gradually move back to the baseline.
    • Use deep targets to improve accuracy.
    • Combine with other serves to develop a diverse serving strategy.

    Conclusion

    Mastering these five serves will make your game more versatile and challenging for opponents. Start with power and lob serves as your foundation, then gradually add short angled, sidespin, and topspin serves as you gain confidence and control. Regular practice, precise placement, and strategic variation will elevate your pickleball game and keep your opponents guessing.

  • 5 Best Solo Pickleball Drills

    5 Best Solo Pickleball Drills

    If you’re ready to improve your pickleball game but don’t always have a partner, you’re in luck! At HomeforPickleball, we’ve designed five simple yet effective solo drills to help you sharpen your technique, improve consistency, and gain confidence, all on your own!

    Whether you’re just getting started or looking to get beyond that 4.0 level, these drills focus on key skills like control, footwork, paddle feel, and shot precision. Let’s dive into each one step by step.

    Solo Drill 1: Static Drop Feed

    If you’re new to practicing alone, the Static Drop Feed is the perfect place to start. It’s a fundamental drill that builds confidence in your hand-eye coordination, paddle control, and groundstroke form.

    The idea is simple—drop the ball, let it bounce once, and strike it cleanly in the center of your paddle. It’s a foundational move that transfers directly to your serves, rallies, and returns.

    How to Do It

    1. Stand with your feet shoulder-width apart.
    2. Drop the ball just in front of your feet.
    3. Let it bounce once.
    4. As it rises, strike it gently in the middle of your paddle.
    5. Focus on form—not power or distance.

    Modifications

    If you have multiple balls, keep them in a small container nearby to maintain rhythm between reps. No court? No problem. Use a wall, garage door, or backyard fence to bounce the ball back and simulate a rally. Avoid practicing near open driveways or roads—the ball can roll away quickly.

    Pro Tips

    • Swing low to high: This promotes the correct motion for a clean groundstroke.
    • Stay relaxed: Keep your wrist loose and let your paddle flow naturally through contact.
    • Aim with intention: If you’re on a court, practice hitting diagonally or cross-court to work on control.

    Solo Drill 2: Topspin Drive

    Next, we move to the Topspin Drive—a key drill for developing a strong, low serve or aggressive baseline shot. The goal here is to make the ball dip quickly after crossing the net, forcing your opponent into a tough, low return.

    How to Do It

    1. Drop the ball in front of you (just like in the Static Drop Feed).
    2. Let it bounce once.
    3. Strike the ball with a loose wrist and a low-to-high paddle motion.
    4. Aim to keep the shot just above the net but deep into the service box.

    Modifications

    This drill works best on a court, but you can simulate it with a portable net or a low barrier at home. Practice within an enclosed area to avoid chasing balls.

    Pro Tips

    • Keep your paddle vertical (90°): This ensures strong, direct contact.
    • Step into your serve: Adding body momentum builds power and consistency.
    • Shift your weight, don’t rush: Smooth movement keeps your control sharp and your stroke balanced.

    Solo Drill 3: Rolling Shot

    The Rolling Shot may not get as much attention as flashy moves like the ATP or Erne, but make no mistake—this shot wins points. It’s all about control near the Non-Volley Zone (NVZ), or as we love to call it, the kitchen.

    Practicing this shot improves your ability to manage fast rallies at the net and build confidence when playing close to the kitchen line.

    How to Do It

    1. Stand just before the NVZ line.
    2. Drop the ball in front of your feet.
    3. Let it bounce once, then hit a smooth, controlled drive shot.

    Modifications

    You’ll ideally need a court for this, but you can recreate the setup at home using tape to mark the NVZ and a portable net. For accuracy, check out our Pickleball Court Dimensions Guide to set it up properly.

    Pro Tips

    • Alternate sides: Practice from both the even and odd courts.
    • Hit with intent: This is your chance to pressure your “imaginary opponent.”
    • Use small steps: Shift your weight rather than overstepping for better control.

    Solo Drill 4: Serve and Split Step

    Your serve sets the tone, but what you do after the serve often determines who wins the rally. The Serve and Split Step Drill trains you to recover quickly and position yourself perfectly for your opponent’s return.

    Many newer players make the mistake of rushing forward after serving, which often throws them off balance. The split step fixes that by grounding you in an athletic stance i.e. ready for anything.

    How to Do It

    1. Stand one foot behind the baseline.
    2. Serve legally, aiming deep into the service box.
    3. Immediately perform a split step—a small, balanced hop landing on the balls of your feet.
    4. Keep your paddle up and eyes forward, ready for the next shot.
    5. Repeat until you naturally transition into the stance after each serve.

    Modifications

    You can shadow this drill at home—no ball required. The key is building muscle memory so that the split step becomes second nature during real matches.

    Pro Tips

    • Serve to the corners: Always imagine an opponent and aim to hit where they aren’t.
    • Stay balanced: Avoid drifting too far forward after serving.
    • Experiment with grips: Try slight variations to find what feels natural for your hand and swing style.

    Solo Drill 5: Shadow Swing

    The Shadow Swing might sound simple, but it’s one of the most powerful drills for improving muscle memory and confidence. Think of it as your personal “mirror practice” — no ball, no net, just form, flow, and focus.

    How to Do It

    1. Hold your paddle confidently with a relaxed wrist.
    2. Swing from low to high, following through fully.
    3. Move your feet naturally, simulating real game footwork.
    4. Repeat while visualizing perfect contact.

    Modifications

    You can do this drill anywhere—your living room, yard, or even your office. If you don’t have a paddle handy, mimic the motion with your hand to reinforce good swing mechanics.

    Pro Tips

    • Experiment with paddles: Test different materials (fiberglass, carbon fiber, etc.) to understand how each affects your control.
    • Use visualization: Try shadow swinging in front of a mirror or with your eyes closed to strengthen mental focus.
    • Make it a habit: Just 5–10 minutes a day can dramatically improve your stroke confidence and readiness before matches.

    Final Thoughts: Practicing Alone Isn’t So Lonely After All

    One of the best things about pickleball is how accessible it is—even when you’re on your own. With just a paddle, a ball, and a little motivation, you can build real skills that translate directly into your on-court performance.

    At HomeforPickleball, we believe solo practice is where players grow the most. It’s your chance to experiment, focus on form, and master techniques without pressure.

    Whether you’re practicing wall volleys, shadow swings, or these five drills, remember: every rep gets you closer to playing like the pros.

  • Pickleball Solo Drills: Beginner to Advance Level

    Even though pickleball is rapidly gaining popularity, there will be times when you don’t have a partner or opponent to play with. Maybe your usual group is away, or perhaps you’re one of the first enthusiasts in your area — either way, that shouldn’t stop you from practicing the game you love. Like any paddle or racquet sport, consistent solo practice is essential for improving your skills. So even if you’re out on the court alone, every hit brings you one step closer to mastering pickleball.

    You can absolutely improve your pickleball game even when you’re on your own. Solo drills — focused, repetitive exercises — help players sharpen their technique, build confidence, and develop a better understanding of their paddle and the ball. Regular solo practice directly translates to stronger performance when you’re back on the court with others.

    So, the next time you’re eager to play America’s fastest-growing sport but can’t find a partner, don’t let that stop you. Practicing alone not only satisfies your urge to play but also helps you level up your skills for your next match.

    In this quick guide, we’ll explore the most effective ways to practice pickleball solo. But before diving in, let’s take a look at why solo practice matters — and how it can make a real difference in your overall game.

    Why Practice Pickleball Alone?

    Pickleball solo drills are simple yet effective exercises that allow players to refine their technique and improve their control using their own equipment. While it might feel unusual to practice alone — especially since pickleball is known as one of the most social and engaging sports — solo training is what truly separates skilled players from casual ones.

    The dedication to practice when no one else is watching is what builds strong fundamentals and elevates your game to the next level. That’s the essence of solo drills — focused, self-driven improvement that helps you grow both physically and mentally as a pickleball player.

    The Impact of Neurons

    Practicing solo drills has a powerful impact on your brain and overall performance. Our bodies rely on neurons — the nerve cells that transmit information — to coordinate movement. When you repeatedly work on a specific drill, those neurons connected to that action start firing more efficiently, helping you perform the skill faster and with greater precision. That’s where true improvement and mastery begin.

    But solo practice isn’t just about physical repetition — it’s also a mental workout. Training alone builds focus, self-discipline, and inner motivation. Without the need for external validation, you learn to rely on your drive to improve.

    By consistently doing solo drills, you’re strengthening the neural pathways that power pickleball-specific skills. This leads to quicker reactions, sharper coordination, and better performance when you’re back on the court with a partner or in doubles play — the most common format of the game.

    The takeaway? Solo practice is your secret weapon for becoming a stronger, more confident pickleball player. To experience how targeted drills can rewire your brain for faster, more precise play, explore our list of customized pickleball drills designed to take your game to the next level.

    What Equipment Do I Need to Do Solo Drills in Pickleball?

    Solo pickleball drills can be done with a variety of equipment, depending on what skill you’re working on. For instance, practicing your serve might require a net, while certain advanced drills may benefit from using a pickleball machine. However, most solo exercises only need the basics — a paddle, a pickleball, and a wall. In fact, you don’t always need a full court to get a productive session in.

    There are plenty of ways to practice pickleball on your own, and we’ve included simple modifications for each drill below. Whether you’re in your driveway, a cul-de-sac, or any smooth concrete area, we’ll show you how to adapt your solo practice routine to keep improving — no matter where you play.

    How to Practice Pickleball Alone: 5 Solo Drills for Beginners

    If you’re ready to start practicing pickleball on your own — whether by choice or necessity — you’re in the right place! At HomeforPickleball, we’ve curated five of the most effective solo drills designed to enhance your technique and elevate your overall game. These exercises are perfect for beginners looking to build strong fundamentals, as well as experienced players aiming to refine their skills.

    We’ll start with a foundational drill that’s ideal for improving overall technique. It’s designed to boost your paddle control, sharpen your hand-eye coordination, and help you feel more comfortable and confident on the court.

    Solo Drill 1: Static Drop Feed

    The Static Drop Feed drill is one of the simplest yet most effective solo pickleball exercises. To do it, simply drop the ball in front of your feet, let it bounce once, and strike it cleanly in the center of your paddle. It might sound easy — and it is, once you get the rhythm down! This drill is excellent for developing consistency in your serves, rallies, and groundstrokes by building confidence in your ability to clear the net and maintain control during play.

    In pickleball, a rally refers to the continuous exchange of shots after the serve until the point ends, while a groundstroke is a shot hit after the ball bounces once. Practicing the Static Drop Feed helps strengthen your grip, refine your form, and improve muscle memory — all of which are crucial for mastering smooth, underhand serves.

    Overall, the Static Drop Feed is a must-have in any solo training routine because it reinforces the core fundamentals of pickleball. While it can be done almost anywhere, you’ll get the best results by practicing it on an actual court.

    How to Perform Static Drop Feed

    • Step 1: Drop the ball in front of your feet
    • Step 2: Let the ball bounce once
    • Step 3: As it bounces upward, hit the ball in the center of your paddle
    • Step 4: Focus on technique and form, not passing the net
    • Step 5: Pick up another ball, or walk to the opposite side of the court where your ball is and repeat

    Modifications

    If you have several pickleballs available, set them on the ground beside you before starting the drill for easy access. Even better, if you own a pickleball machine, this exercise is the perfect opportunity to put it to use. Don’t have one? No problem — you can keep your balls in a small box or container next to you instead. The goal is to keep them within reach so you can maintain your rhythm without unnecessary pauses.

    If you’re practicing with just one ball, perform a static drop feed, then walk to the opposite side of the court to repeat the drill. No court? No worries — find a wall and bounce the ball against it to simulate a rally. A garage door or the side of your house works just as well.

    However, avoid practicing this drill on your driveway or near a road, as pickleballs can easily roll away. For safety and convenience, always choose a spot with a wall or fence to keep the ball contained while you train.

    Pro Tips

    • Swing low to high: Start by dropping the ball and swinging your paddle from a low position — close to the ground but without touching it. As the ball rises, make contact at mid-air and follow through with an upward motion. This low-to-high swing helps you generate a smooth, powerful groundstroke, a key skill that benefits nearly every shot in pickleball.
    • Keep your strokes smooth and relaxed: Pickleball is known for being a fun, social, and easygoing sport — and your swing should reflect that. Keep your movements relaxed yet purposeful. A calm, controlled stroke ensures you hit with just the right amount of power — strong enough to stay consistent, but not overly forceful.
    • Aim across the court: Practicing the Static Drop Feed on a pickleball court is ideal because it allows you to target different areas — whether diagonally, straight across, or down the center. Consistently hitting these targets helps you build confidence in clearing the net and improves your precision and control during real matches.

    Solo Drill 2: Topspin Drive

    The next solo drill is all about building power and precision in your serves. Practicing the Topspin Drive helps you develop one of the most effective offensive shots in pickleball — a serve that stays low and dips quickly after crossing the net.

    A Topspin Drive creates a downward trajectory on the ball, forcing your opponent to hit from a lower position, which makes it harder for them to sustain a rally. It’s also a great way to practice serving deep, keeping your opponent pushed behind the baseline and on the defensive.

    Keep in mind, this drill doesn’t aim to make the ball barely skim over the net and drop into the kitchen — that would be an illegal serve. Instead, the goal is to master a controlled dip that stays low while still landing in the correct service zone.

    To perform a Topspin Drive, start with a Static Drop Feed. Keep your swing low but ensure the ball clears the net. Maintain a relaxed grip and let your wrist stay loose — this helps you keep the ball low while generating natural topspin and momentum. Finish your shot with a smooth low-to-high follow-through, as mentioned earlier, to create that perfect combination of control and power.

    How to Perform Topspin Drive

    • Step 1: Drop the ball in front of your feet
    • Step 2: Let the ball bounce once
    • Step 3: As it bounces upward, hit the ball in the center of your paddle with a loose wrist
    • Step 4: Use just enough technique to let the ball pass over the net, but that it stays low to the ground after
    • Step 5: Pick up another ball, or walk to the opposite side of the court where your ball is and repeat

    Modifications

    Unfortunately, this solo drill requires a pickleball net, so it can’t be effectively practiced against a wall. If you don’t have access to a court, try setting up a portable net instead. You can also simulate the motion by hitting over a low barrier, such as a chair or couch, to work on your technique.

    For safety reasons, always perform this drill in a contained area where the ball won’t roll away or cause distractions. Avoid practicing in open spaces like driveways or near roads — it’s best to keep your practice environment safe and controlled.

    Pro Tips

    • Maintain a 90-degree paddle angle: When the ball bounces and you prepare to hit it, aim to make contact with your paddle positioned at a 90-degree angle. This technique produces a stronger, more controlled groundstroke, giving your shot extra power and precision. You can execute a topspin using an underhand motion, but using a western grip will help you achieve a better angle and spin at the point of contact.
    • Step into your serve: As the ball drops and bounces, step forward into your swing. This movement adds momentum to your shot and helps generate a more powerful groundstroke. Start your serve from slightly behind the baseline so you can step into it naturally without crossing the line — crossing the baseline during a serve would count as a fault in a real game.
    • Adjust your stance for control: Some players prefer to keep their feet steady and shift their body weight for added control, while others like to take a small two-step motion behind the baseline to generate more power. Experiment with both techniques to find which footing feels most comfortable and gives your Topspin Drive the best combination of strength and stability.

    Solo Drill 3: Rolling Shot

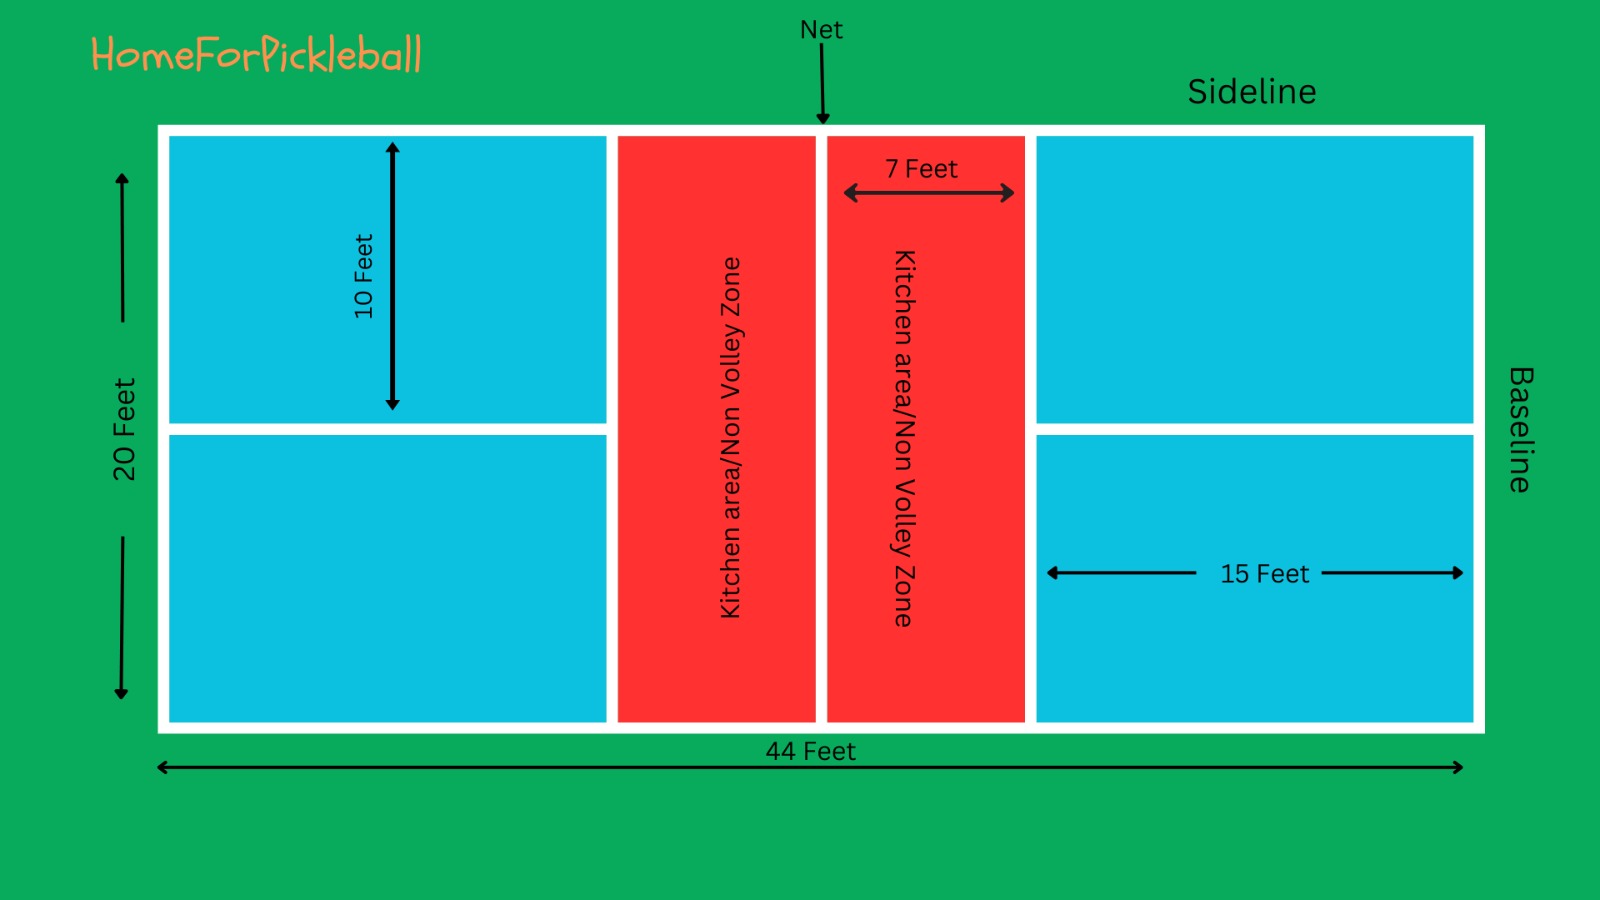
    The rolling shot is one of the most overlooked yet effective techniques in pickleball. While flashy moves like ATPs and Ernes often grab attention, it’s the rolling shot that quietly earns players the majority of their points. To execute this shot, hit a groundstroke just before the non-volley zone — also known as the Kitchen, the rectangular area closest to the net.

    This solo drill is perfect for improving your rally consistency. During a match, when you and your opponent are rallying near the kitchen line, it’s all about maintaining control without violating the non-volley rule. Practicing the rolling shot helps you develop the precision and touch needed to stay consistent and confident in those fast-paced exchanges close to the net.

    Additionally, this drill can help refine your drives — shots that travel straight and low across the court, pushing your opponent deep into their backcourt. The goal of a drive is to move your opponent out of position, creating openings to win points. A classic example is the third shot drive, a powerful and strategic follow-up to the serve return (not to be confused with the third shot drop).

    How to Perform Rolling Shot

    • Step 1: Drop the ball in front of your feet and before the non-volley zone
    • Step 2: Let the ball bounce once
    • Step 3: As it bounces upward, hit the ball in the center of your paddle with a loose wrist. Focus on performing a drive.

    Modifications

    This solo drill works best on an actual pickleball court, since it depends on practicing around the non-volley zone (NVZ) and its boundary line. However, you can easily recreate a similar setup at home using some masking tape and a portable net. Just be sure to mark the area with accurate measurements to mimic real court conditions. For guidance, check out our Pickleball Court 101 guide — it includes all the official court dimensions and step-by-step instructions for marking your own practice space.

    Pro Tips

    • Train the right and left side: After executing a Rolling Shot, switch sides and repeat the drill. For example, if you started serving from the right, move to the left for your next attempt. Practicing from both sides of the court helps build balance, confidence, and consistency in your serves and groundstrokes.
    • Add power to your serve: The Rolling Shot is your opportunity to play more assertively. As rallies become faster and more competitive, channel the momentum from your drive practice to make your serves stronger and more precise. This added intensity will help you push your opponent deeper into their court.
    • Less movement is more: Some players find it more effective to shift their body weight from one foot to the other instead of taking an actual step. Experiment with both techniques during this drill to discover which gives you better control, rhythm, and shot accuracy.

    Solo Drill 4: Serve and Split Step

    Whether you’re playing singles or doubles, your serve is one of the most powerful tools in your pickleball arsenal — it sets the tone for the point and determines who takes control of the rally. However, delivering a strong serve is only half the battle. The other half lies in mastering your positioning immediately after the serve, which is why incorporating the Serve and Split-Step Drill into your practice routine is essential.

    This drill helps you stay balanced and properly positioned to respond effectively to your opponent’s return. A common mistake many beginners and even intermediate players make is rushing into the court right after serving. This often leads to poor balance and forces them to backpedal awkwardly to handle the next shot.

    The solution is the split-step — a small, controlled hop that gets you ready for your opponent’s return. Once you start using it, you’ll notice an instant improvement in your movement, balance, and overall control on the court.

    How to Perform Serve and Split Step

    • Step 1: Begin by positioning yourself about one foot behind the baseline, whether you’re on a regulation court or a marked practice area.
    • Step 2: Execute a legal pickleball serve, focusing on control and consistency.
    • Step 3: Immediately after serving, make sure you remain behind the baseline and perform a split step — a small hop that allows you to land lightly on the balls of your feet, keeping you ready for the return.
    • Step 4: Keep your paddle pointed toward the ball while maintaining your split-step stance, ensuring you’re prepared to react quickly.
    • Step 5: Continue using this ready position after each shot as you advance toward the kitchen line, maintaining balance and control throughout the rally.
    • Step 6: If you or your partner happens to send up an easy lob, backpedal quickly, reset into your split-step stance, and prepare to continue the rally. Once stable, work your way back toward the kitchen line to regain your strategic position.

    Modifications

    Getting to a pickleball court just to practice this drill isn’t always practical, so aim to perform the Serve and Split-Step Drill on a real court at least once a week. On other days, you can do shadow drills that mimic the same movements wherever you have space — such as in your driveway, backyard, or even indoors. Consistently practicing these motions will help you build muscle memory, so the serve-and-split-step transition becomes a natural, automatic part of your game.

    Pro Tips.

    • Aim for the corners: At Home for Pickleball, we encourage players to practice every drill as if they’re in a real match. When performing your serves, visualize an opponent on the other side and aim for the corners of the court to improve accuracy and placement. You can even use a cone or marker to simulate your target and make your practice more game-like.
    • Experiment with grip and hand placement: Treat your serve practice as a chance to explore and improve. Don’t be afraid to make mistakes — instead, use them to discover which grip and hand movement feel the most natural and comfortable for you. Consistent experimentation leads to a more confident and effective serve over time.

    Solo Drill 5: Shadow Swing

    A Shadow Swing may sound like a move from a ninja playbook, which could be partially true, considering it will give you ninja reflexes on a pickleball court. To do this all you have to do is perform a shadow swing by swinging a pickleball paddle without hitting anything.

    At first it may feel a bit weird, but don’t worry, we all have felt that way, after doing this routine for a couple of times you will naturally start incorporating it into your warm ups. 

    How does Shadow Swing help in Pickleball?

    Shadow swing helps a player visualize themselves hitting a perfect shot and to get confident with swinging a pickleball paddle with proper form.

    How to Perform Shadow Swing

    • Step 1: Hold the paddle with confidence while keeping a loose wrist so you can swing the paddle with finesse
    • Step 2: Start swinging the paddle low to high as you would in a match
    • Step 3: Start swinging the paddle with proper footwork, move around as you would while you were on a court

    Modification

    Do it any time any where, do it in the bathroom without a paddle, once you start seeing the difference, everyone will ask you how you did it.

    Pro Tips

    • Try different paddles: Pickleball as we know is constantly evolving and so are the paddles, we have already gone from wooden paddles, to fiber glass and now carbon fiber paddles, so it is always good to try out new paddles to get used to the pace of the game. Although one of our team member always says, “Its the player and not the paddle.”
    • Use imagery: Practice a clean swing in front of a mirror, or if you are already on the court , do the swing motion with your eyes closed this will help you visualize your self hitting shots confidently, which in turn will help settle the nerves once the game starts, players can do this in req games and tournaments it always helps.
    • Do this at home: We cannot emphasize enough on the difference it will make if you just spend 5-10 minutes at the very least and do Shadow Swinging at home. This will help you feel confident about your technique even before you step onto the court which in turn will give you great momentum throughout your session on court.

    Practicing Alone Isn’t So Lonely After All

    The best part of Pickleball, while there are so many, in this particular case is that there are many solo drills which can be done even at home and does not require a partner. The most popular solo drills that are guaranteed to make you a better pickleball player are fast hands with a wall and shadow swings to visualize yourself hitting a perfect shot.

    Do we need specialized equipment for Solo Pickleball Drills?

    We get asked this question a lot, and the answer is not really. Your regular pickleball paddle and ball are enough to do the job, however, to counter certain limitations you can check out there solo pickleball equipements as well. A fan favourite is the soundproof ball that does not disturn the neighbours.

  • Pickleball Kitchen or Non Volley Zone Explained

    Pickleball Kitchen or Non Volley Zone Explained

    Pickleball is a sport that takes a minute to learn and forever to master, which is exactly why it is becoming the fastest growing sport all over the world. But why is Pickleball so interesting? Isnt it just like a smaller version of Tennis? To answer these questions you first need to know about the Kitchen is Pickleball. 

    If you have come here to learn about the Kitchen rules of Pickleball then welcome to the gang which consists of players from all levels ever since 1965. So without further adieu, lets get a concrete understanding of all the Kitchen rules and how they affect the game of Pickleball, at the end of the article we have also created a list of kitchen rules that can possibly be modified in the near future as our most loved game keeps on evolving.

    What is the Kitchen in Pickleball?

    The kitchen area—also called the non-volley zone—is a seven-foot section on both sides of the pickleball net. According to official rules, players are not allowed to hit a volley while standing inside this zone. This rule was designed to prevent the serve-and-volley strategy often seen in tennis and to stop players from camping at the net to easily smash every return, which would otherwise be simple given the smaller size of a pickleball court.

    To put is simply, no player can hit the ball before it bounces if he/she has any part of their body or any part of their gear that is on their personnel which has enteren the kitchen zone, please note: the Kitchen line is also a part of the kitchen zone.

    This rule. However, is not applicable is a player is outside the kitchen zone and decides to reach and hit the ball off the air while the ball is floating over the kitchen zone, thus making the kitchen a 2D area and not 3D. 

    If the ball bounces in the kitchen area, players are free to enter the kitchen area and hit a shot, if the return is quick and you find yourself still in the kitchen you will have to step out to hit a shot or wait for the ball to bounce.

    Failure to follow this rule results in a fault, and the point or break of serve is rewarded to the opponents.

    We know this is a lot to process for a mere 7 foot zone, so here is how we breakdown the rules for all to understand. First we explain what exactly is a volley in Pickleball followed by how it impacts the kitchen zone and then finally list down the most common questions related to the kitchen area along with a clear cut answer about it.

    What is a Volley?

    In pickleball when you hit the ball before in bounces it is called a volley. This shot is normally used to attack the opponent thus volleys are also referred to as “overheads” or “smash shots.” As long as  a player does not step into the kitchen area, they can hit  Volley shots from any position on the court, or even from outside the measured pickleball court area.

    A volley shot is seen as a finisher shot in almost all racquet sports, players often work on strategies to make their next shot a volley and the same is with the sport of Pickleball. However given that a pickleball court is small in size, volleying from the net would be a clear disadvantage thus the kitchen rule/non volley zone has been set up.

    Can You Ever Step in the Kitchen in Pickleball?

    Yes — as long as you’re not hitting a volley while inside the non-volley zone, you’re completely allowed to stand in the kitchen. In doubles play especially, positioning yourself near the kitchen line is ideal — it gives you a strong spot to volley effectively while also allowing you to reach and respond to softer shots with ease.

    A common misconception among beginner level players is that the kitchen area or Non-volley zone cannot be entered at all. So first things first, you have learned that this statement is not true. A player can step into the kitchen whenever they want as long as they are not hitting a volley while standing in the kitchen.

    Can You Go into the Kitchen Before the Ball Bounces?

    Yes! You’re simply not allowed to volley the ball while standing in the kitchen. You can step into the zone, but before hitting a volley, both feet must be completely outside the non-volley area. Otherwise, you need to wait for the ball to bounce before making your shot—while still following all the other kitchen rules.

    We’re sure you’re starting to sense a theme at play here. But don’t take our word for it, let’s look at the book of pickleball kitchen rules.

    Can a Pickleball Serve Hit the Kitchen Line?

    In pickleball, a legal serve cannot land on the kitchen line — also known as the non-volley zone line — or even touch it. If the ball hits this line, or the connected centerline or sideline, it’s considered a fault during the serve.
    This makes the game more interesting as all players have to ensure that not even a little part of their feet is stepping on the kitchen line while taking a volley. 


    Official Kitchen Rules of Pickleball – USA Pickleball

    The kitchen area in pickleball has always been an area that has been debated the most, but that is what makes this sport so interesting. The Erne and Bert are loopholes that bypass the official kitchen rules, but other than that there are still some rules about the kitchen that you should know about, this will make you stand out on any pickleball court.

    Non-Volley Zone Rules: General Rules of the Kitchen

    Section 9 of USA Pickleball’s 2023 rule book (page 44) is where you will find all the answers related to the kitchen area in Pickleball. To simplify it, we have listed each rule below along with a 1 sentence explanation. 

    • Rule 9.A. – A player cannot hit a volley while touching the kitchen.
    • Rule 9.B. – If a player or their paddle touches any part of the kitchen while volleying,then it is considered as a fault. Even after you have completed the point, follow-through, momentum, or anything you’re wearing is not allowed to touch the kitchen area.
    • Rule 9.C. – If a players momentum takes them in the kitchen it is a fault, for a doubles match if both players collide and the player who hit the volley lands in the kitchen then that too will be considered as a fault.
    • Rule 9.D. – If a played is inside the kitchen area, they cannot volley volley until both feet are completely back out of the kitchen. Taking the volley by jumping is also a fault if the played has made the jump while they were inside the kitchen area. 
    • Rule 9.E. – A player is allowed to be in the kitchen as per their preference but not when taking a volley shot.
    • Rule 9.F. – A player is allowed to hit the ball from the kitchen provided it has bounced first.
    • Rule 9.G. – A player can stay back in the kitchen even after they hit a shot off the bounce, and can also return the next shot if it has bounced in the kitchen. But if its a volley then that would be a fault.
    • Rule 9.H. – In a doubles match, if you are standing inside the kitchen and your partner has hit a volley from outside the kitchen then this play is completely legal and the rally can continue.

    Momentum: What Does It Mean in Pickleball?

    Momentum based kitchen rules are defined as Rules 9.B.1., and 9.C., however it is considered as incomplete definitions. To find a simplified ruling the USA Pickleball has defined momentum for all of us as rule 3.A.20., which reads as follows:

    • Rule 3.A.20. – Momentum is a property of a body in motion, such as a player executing a volley, that causes the player to continue in motion after contacting the ball. The act of volleying produces momentum that ends when the player regains balance and control of their motion or stops moving toward the non-volley zone.

    To understand in simple terms, regardless of the movement being intentional or unintentional after the player hits a volley, if they fall in the kitchen then it is considered as ‘stepped into the kitchen’ fault. So remember, the next time you volley, make sure to remain outside the kitchen till the whole rally is resetted

    Serving: How the Kitchen Rules Apply

    • Rules 4.A.2. and 4.M.5. The serve may clear or touch the net and must clear the NVZ and the NVZ lines… This ensures that the serve lands only in the service court, which is diagonally opposite to the serving player. That area does not include the kitchen – and since the kitchen includes its line, that’s also off-limits.

    Partially unrelated, the service court does include every other line that forms its boundary, such as the baseline, sideline, and centerline. Serving has a long list of rules, so be sure to brush up on them as you get more entrenched in the sport. Not doing so is a quick way to earn avoidable faults.

    Hopefully, this gave you a clear and simple understanding of the kitchen and its rules. If you ever come across any misconceptions about them, you’ll now know the facts—and can help clear things up for others.


    Common Questions related to the Non-Volley Zone

    We often notice that most players have repeatedly asked these questions which do not have a definitive answer in the rules, thus we mentioned these questions along with a crystal clear answer for the same.

    Can You Jump and Land in the Kitchen in Pickleball?

    Yes, a player can jump and land in the kitchen in pickleball—as long as they don’t hit a volley while doing so. Other than that, players are free to stand in the kitchen for as long as they want and can hit any shot that bounces before contact.

    Momentum is another factor that a player has to watch out for in order to plan their jump and land, for further detailed information on this do check out rule
    3.A.20. Which is highlighted above in the article.

    What Can You Not Do in the Kitchen In Pickleball?

    Yes, you can definitely “cook” your opponent in the kitchen—but keep in mind, there are two key faults related to this area in pickleball.

    1. A serve must clear the kitchen, including the kitchen line.
    2. A player cannot volley while standing in the kitchen. If any part of your body or paddle touches the kitchen after hitting a volley due to momentum, it’s considered a fault, and the point goes to your opponent.

    When Can You Go into the Kitchen in Pickleball?

    You’re allowed to enter the kitchen at any time, as long as you don’t volley the ball while standing inside it. It’s also completely fine if your partner volleys while you’re in the kitchen. Another valid reason to step into the kitchen is when you’re hitting a ball that has already bounced.